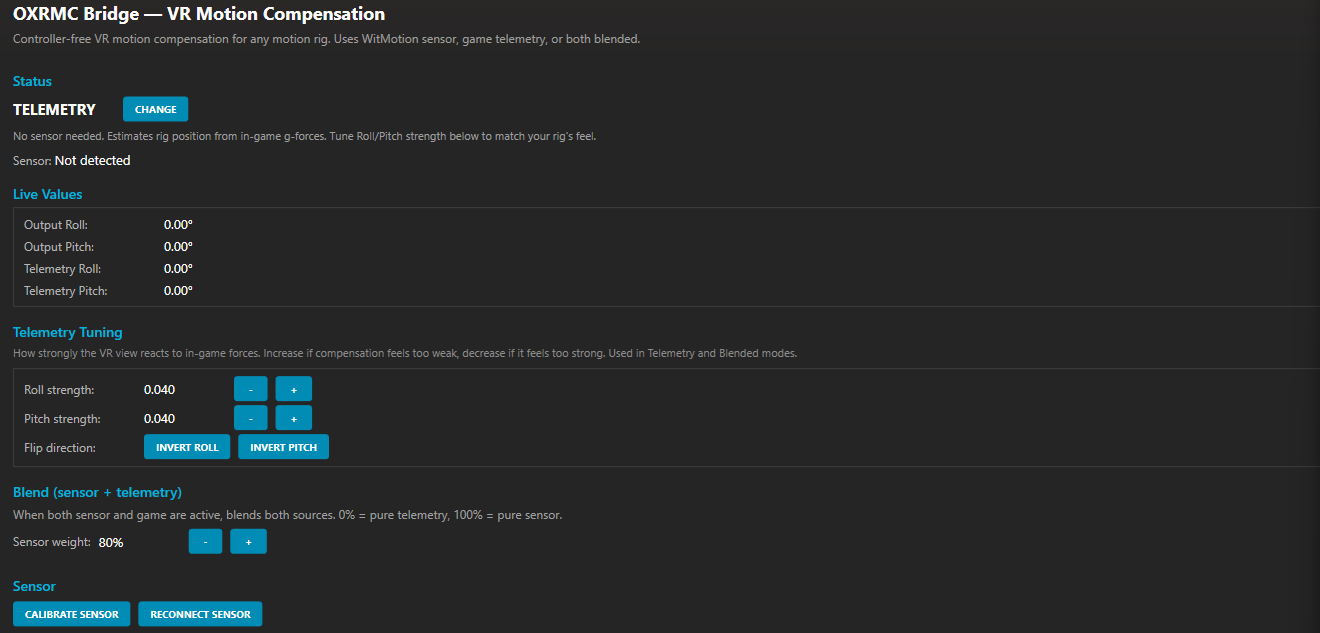
OXRMC Bridge feeds your motion rig's real pose straight into OpenXR-MotionCompensation — so your VR view stays locked while the rig moves. No controller to strap on. No controller falling asleep mid-stint.
VR motion compensation needs an independent reference for how the rig is moving. The documented trick is to strap a VR controller to the rig — but the controller goes to sleep when idle and drops tracking, and there's no setting to keep it awake.
OXRMC Bridge generates the rig's pose itself and writes it to the shared memory OpenXR-MotionCompensation reads. Nothing to mount, nothing to charge, nothing that sleeps. Set it once and forget it.
Two modes, automatic switching. Plug in a sensor for true physical accuracy, or run it with zero extra hardware off your game's telemetry.
| Mode | Source | Accuracy | Requires |
|---|---|---|---|
| Sensor | WitMotion sensor on the rig | High — measures actual physical tilt | WitMotion WT901C-RS232 + USB adapter |
| Telemetry | Game g-forces via SimHub | Approximate — estimated from accelerations | Nothing extra |
When a sensor is connected, the plugin reads the rig's real pitch and roll. If there's no sensor (or it disconnects), it automatically falls back to estimating rig motion from the game. Either way it writes to the motionRigPose shared memory that OXRMC reads with type = flypt.
Anything SimHub supports, including:
type = flyptEvery rig has its own post spacing, so measure yours and enter length, width, actuator stroke and 3- or 4-post layout in the plugin panel — it calculates your max angles automatically. No rebuilding, no code. (It ships pre-filled with the author's Sigma Integrale DK2 values as an example — just replace them with your own.)
Two parts: first install OpenXR-MotionCompensation (the tool that actually stabilises your view — this plugin feeds it), then install the plugin and calibrate. Takes about ten minutes the first time.
Grab the latest installer from the official OXRMC releases page — the file named Install_OpenXR-MotionCompensation_<version>.exe.

Run it with your normal gaming Windows account so its settings land in the right place. Accept the default install location (a subfolder of Program Files works for all headsets, including WMR).
Launch OpenXR-MotionCompensation (or start any VR game with it) once, so it creates its config file. That's all you need here — the next part sets it to flypt for you automatically.
type = flypt in the [tracker] section.
Close SimHub. Download User.OXRMCBridge.dll and copy it into your SimHub folder (default C:\Program Files (x86)\SimHub\).

Start SimHub → click Add/remove features in the left menu → find OXRMC Bridge and turn it on (also enable Show in left main menu) → restart SimHub when asked.

After restart, OXRMC Bridge appears in the left sidebar. Under OXRMC Setup, click Auto-configure OXRMC (flypt) — it sets the tracker type for you and backs up your config. (Skip this if you already edited the .ini by hand.)
With no sensor the plugin runs in Telemetry mode; plug in a WitMotion sensor and it switches to Sensor. Live roll/pitch values move once a game is running.

Under Rig Dimensions, pick your post layout (3- or 4-post) and enter your rig's length, width and actuator stroke in mm. The plugin uses these to work out your max pitch/roll — wrong numbers mean wrong compensation limits.

Launch your sim in VR (OpenXR). With the rig at its neutral resting position:
CTRL+DEL — calibrate (sets the reference pose)CTRL+INS — activate / deactivate compensationCTRL+D — toggle the centre-of-rotation overlay while you align it to your seatDrive a lap — the rig moves, your horizon stays put. If an axis fights you, use the plugin's Invert Roll / Invert Pitch buttons.
The plugin is an unsigned .dll, so Windows SmartScreen may warn you on download — this is normal for free open-source tools and doesn't mean anything's wrong. The full source is on GitHub if you'd rather build it yourself. Click More info → Run anyway, or right-click the file → Properties → Unblock.
It works as soon as it's installed, but a couple of OpenXR-MotionCompensation settings are worth knowing — especially if the view looks shaky. Use the plugin's Open OXRMC Config button to edit them, then reload OXRMC with CTRL+SHIFT+L.
This is the #1 fix for a jittery horizon. In the config under [input_stabilizer] set enabled = 1 and strength = 0.5. Higher = smoother but more latency. (OXRMC samples the tracker at ~600 Hz and low-pass filters it.)
Telemetry mode estimates tilt from in-game g-forces, so it's naturally a bit rougher. A mounted WitMotion sensor (Sensor mode) reads your rig's actual tilt and is far smoother. The stabilizer above helps both.
For more damping, raise [rotation_filter] and [translation_filter] strength from 0 toward ~0.1–0.3. Same trade-off as always: smoother motion, a little more latency. Leave at 0 if it already feels good.
Auto-configure also sets auto_activate = 1, so compensation kicks in by itself after a 10-second countdown — no need to press CTRL+INS every session. You can still toggle it manually with CTRL+INS any time.
I built this for my own rig and I'm sharing it because the sleeping-controller problem drove me nuts too. If it saved you the hassle (or your neck), a coffee keeps the updates coming. Totally optional — enjoy it either way.
☕ Support on Ko-fi